Garrattfan's Modelrailroading Pages
MDC 3tr Shay
Lettering
March 17, 2006
Putting a decal here or there may be a little tricky, but lettering is most demanding for your nerves and your self esteem. It is not only very time consuming, one wrong move of your brush can kill your hopes and dreams in a wink. There is one piece of good news though: you can't mess up your model if you do something wrong. If you do, simply remove the decals and start over again. That is, if you do that before you fix the decals. Once that's done you're stuck to the result. |
||
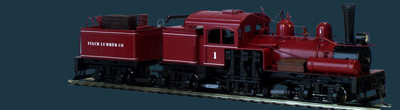
After lettering the tender looks like
this. |
What makes lettering difficult? Well I guess our eyes are very critical about slanting, aligning and spacing of letters. You'll find out for yourself once you start lettering: every angle, every space, every misalignment is visible. A misaligned word can spoil all the good work on your model. No one will notice the perfectly airbrushed model when "the words just came out wrong" and in this case it doesn't help "to say I love you in a song".The instruction leaflet that comes with the decals is instructive and limitlessly positive about the ease with which you can align the letters. And in the very one example the leaflet contains, it also clearly shows how hard a job it is to position letters correctly. They are slant, misaligned and irregularly spaced, just about anything that can go wrong!! | |
 |
Nevertheless the leaflet gives you some handy tips:
Reality is a bit harder, but given enough time and practice you will get good results |
|
 |
||
 |
 |
|
The letters cut and laid out. I measured
the approximate size to estimate the placement of the first letter and the
tender body. By the way: the photo shows the ruler in metric measures |
Finch? (My name in English) I did not document the first letters, so you'll have to do with the result. The letters are still soaked in MicroSol to snuggle down. |
|
 |
 |
|
Letters in the water to soak |
Picking up letters with a brush and the spatula | |
 |
 |
|
| Moving the letter from the spatula with the brush | Not much of a placement, but don't worry about that. The water evaporates only slowly and you can always add a little water with the brush. As long the decals are wet, you can move them around |
|
 |
 |
|
All letters are present. I worked word by word. If something goes wrong you only spoil one word at a time. |
Moving letters to their places. Take your time. Work hard, not fast |
|
 |
 |
|
| Almost there!! | Check before softening the decals with MicroSol | |
 |
 |
|
| The last letters being coaxed into their respective postions | The end result. The decals are softened with MicroSol and fixed with MicroSet. In hindsight I'm happy with the word "Lumber" but not with "Finch", the I and the C are a little off place |
|


All the tooling you need for lettering your model

Sign my
GuestBook